C
Cate
Guest
- Thread Author
- #1

Outfit Details
1930s Gingham Jumper – Made by me
1930s White Linen Skirt – Made by me
1930s Reproduction Shoes – Royal Vintage Shoes
1930s Navy Crochet Handbag – Kate Kitsch
Lapis Lazuli Drop Earrings – Shepton Mallet Flea Market
1930s Style Sunglasses – Had them for years
1930s White Linen Skirt – Made by me
1930s Reproduction Shoes – Royal Vintage Shoes
1930s Navy Crochet Handbag – Kate Kitsch
Lapis Lazuli Drop Earrings – Shepton Mallet Flea Market
1930s Style Sunglasses – Had them for years

When I first spotted this beautiful 1930s gingham jumper pattern on Etsy I was absolutely convinced it was knitted. As someone who can’t knit, I completely discounted the pattern, knowing that I would never be able to make it. It wasn’t until someone I follow on Instagram posted it and said they wished that they could crochet, so they could make it, that I actually realised it was crocheted! As you can imagine, I jumped back on Etsy immediately and purchased it and I’m so glad I did.


Despite how complicated it all looks, this was actually really easy to do and this is reflected in the written pattern. It’s quite possibly the shortest set of instructions I’ve ever used for a crochet jumper!
If you watched my first Vintage Crochet Projects Podcast on YouTube, you’ll already know how the gingham effect is created. But for those who haven’t, the horizontal stripes are crocheted simply by doing one treble (UK terms), then one chain and repeating this across. You do this for four rows in one colour and then swap to the other colour and so on. This creates a grid-like effect and is done throughout the jumper, just making increases and decreases when necessary.
Once each piece, i.e. the front, back and two sleeves, is done, you weave in the vertical stripes using a yarn needle and 2 strands of wool. You need to cut the yarn long enough to do the whole four vertical rows each time, otherwise you’ll either run out half way a long a row or will have even more ends to weave in. And trust me, there are enough of them anyway, about 250 to be precise! And there’s absolutely no way around it either.

The weaving in of the vertical stripes, obviously, took me the most time and after a while it became a real labour of love. I could see how incredible the effect looked, and didn’t want to give up, but it took hell of a lot of my patience to keep going. However, nothing quite prepared me for weaving in all of those ends. I actually sat for two hours in the Mini garage one Saturday morning waiting for my car to be serviced and made a start on it, but I barely scratched the surface in that time! Thankfully none of the ends can now be seen, but there’s a fair amount of tiny little knots on the inside, believe me.

The waistband and sleeve cuffs are knitted (by my ever-obliging mum!), and weirdly the pattern said to crochet the neckband. This was simply done with rows and rows of double crochet (UK terms). I do think it would’ve looked better if it was knitted, just so it matched the other solid blue areas, but it doesn’t bother me at all.
The bow was crocheted and actually is very different to the bow in the pattern’s photo, but I followed the instructions to the letter. They clearly decided not to go with that design when they wrote the pattern. The one in the photo looks like a double bow, with the underneath bow reaching almost as far as the shoulder seams. The one that I did, however, is smaller and rather more wearable. I couldn’t decide whether to do the main part of it in red or blue, so initially made it up in red and have made it completely detachable. I plan to make it in the reverse when I get a chance, so I can swap and change it with my mood.
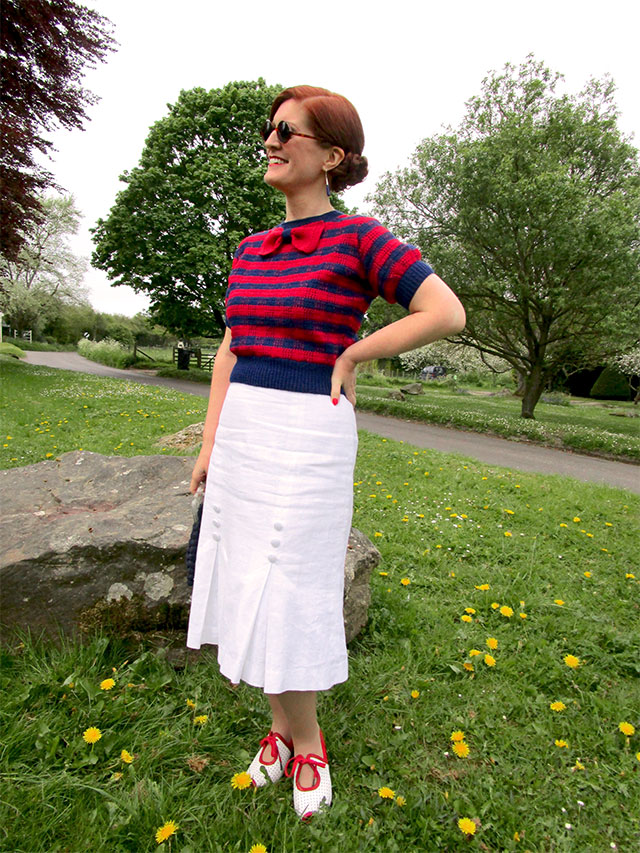
I’m really thrilled with how it turned out, it’s such an interesting jumper. The day we took these photos, we were on our way to The Yarn Shop Day at my not-so-local yarn shop and when we got there, the jumper received a lot of attention. Just like me initially, people were absolutely amazed that it was crocheted and not knitted. One lady, though, did say that she had a modern pattern that used the same technique, so you wonder if they’d seen this pattern and used the idea.
On the day I teamed it with my favourite white linen 1930s skirt that I made way back in 2015. It was made using a self-drafted pattern, which I’ve used and adapted multiple times, and has featured on the blog time and time again, here, here and here. I know you’re probably bored of seeing it now, but I’m very much someone who likes to mix and match my clothing, rather than having just one thing that goes with something else. It’s the joy of being a separates lover!
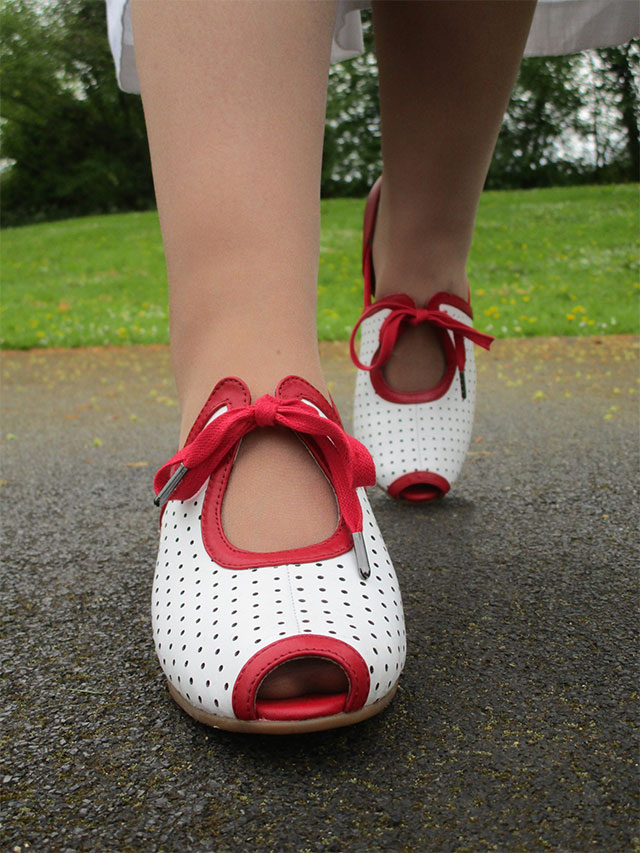
The shoes are the most incredible 1930s reproductions from Royal Vintage Shoes. The second they released the teaser photos for these, I knew I had to have them. They’re everything I could wish for in a shoe – not only do they look as authentic as possible, they’re also extremely comfortable. I’m also not afraid that they’ll break or fall apart at any minute, like I am every time I wear my original 1930s ones. Of course, I now want them in blue as well. Ooo, they’d go with this outfit too!


As you can see from my big beaming smile, I’m very happy with this jumper. Okay, I absolutely love it! Despite how long it took, just under three months, I would definitely consider making it again. The colour options are endless and it would look amazing in white teamed with a bright colour like emerald green or royal blue. I could also see it in a mix of more muted colours, such as peach and mint green.

Project Details
Pattern: 1930s Gingham Jumper by Corticelli (official name – M83 Sweater) from Subversive Femme on Etsy
Yarn: Cascade 220 Fingering in Twilight Blue (9568) and Christmas Red (8895) – almost 3 skeins of each – bought from Love Knitting
Hook: 2.25mm steel hook
Total cost: £22.78
Oh, and for those you who may be interested, you can find this project on my Ravelry page.
The post Finished: 1930s Gingham Jumper in Crochet appeared first on Vintage Gal.